


User Manual
effects
VirtualDJ offers the ability to apply a variety of Effects to a specific deck as well as the Master Output (see Master Panel). A large selection of effects are included in the software and can be accessed in different layouts.
For a complete list of native effects included with VirtualDJ, please see here.
STARTER

The Starter Layout offers a simple 3 dial FX Panel. Moving the dials left or right will increase or decrease the strength of the effect. Double clicking on the dial will turn off the effect returning it to the 12 o'clock position.
3 effects are offered: Filter, Flanger, and Cut. These effects cannot be changed in the Starter Layout.
ESSENTIALS

The Essentials Layout offers a Single FX panel. In this view, a single effect slot is offered with 2 parameter dials and a button to open the effect’s Graphical User Interface in the SideView area of the browser.
Clicking on the effect name will trigger the desired effect, while clicking the dropdown arrow will open the FX menu providing the ability to select one of the many other effects available.
PRO


The Pro Layout offers multiple effects panel configurations that can be selected and toggled from the FX Toggle button. Regardless of the layout chosen, the FX panel works identical by clicking on an effect to activate it, using the dropdown beside the effect name to select different effects, and using the buttons to open the effect’s Graphical User Interface in the SideView area of the browser.

Clicking on the View Selection button inside the FX Toggle will provide the 5 different available views: FX x3, FX x1, FX x3 (full), FX x6 and Pads 16 (if you wish to display 8 additional pads instead of the FX panel).
As many of these views can be selected (marked with a check mark) to toggle through each look quickly by using the FX Toggle button.
USING EFFECTS
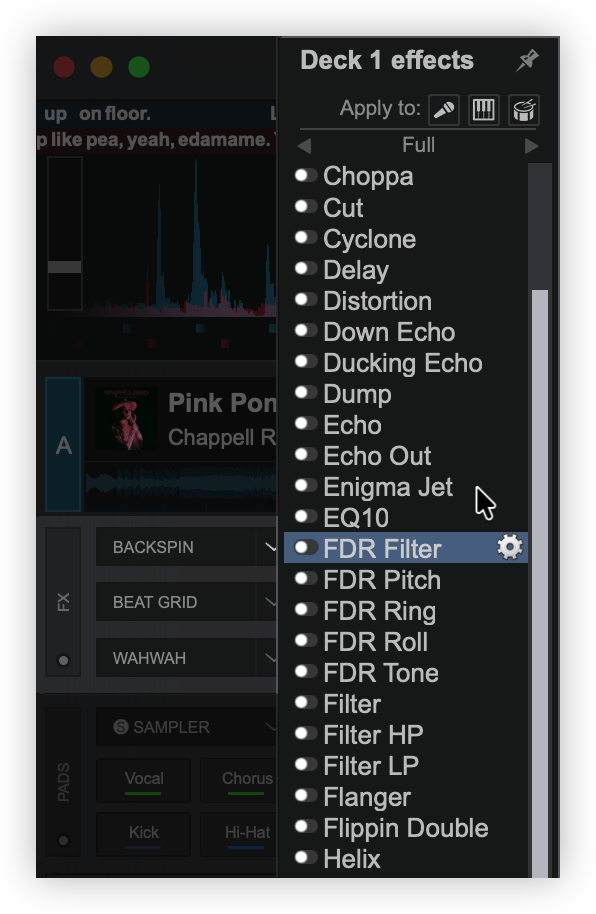
Click on the Pin icon to the right of Sound Effects to keep the Effect Selection list visible (pinned) after effect selection if required.
Once the Effect is selected it can be activated by clicking on the effect name in the Deck Effect Panel or in the Effect Selection List by clicking on the Activate Button to the left of the desired effect.
Multiple effects can be triggered from the Effect Selection list simultaneously regardless of the number of Effects visible in the Deck Effect Panel.
The Effect can then be unpinned by using the Pin icon on top of the Effect GUI so that it can be re-positioned to anywhere on the screen for greater customization and ease of use. Clicking on the X will close the Effect GUI regardless of it’s position but will not deactivate the effect.

Some effects can be used post-fader providing that the hardware being used supports it. For a complete explanation on the difference of Pre-Fader and Post-Fader effects as well as how to configure them please see: PRE AND POST FADER EFFECTS
EFFECTS ON STEMS
The Pad is toggled through 3 Stem FX modes; Vocal, Melody, or Rhythm.
When Stem FX are enabled for a specific stem, the effect will only be applied to that Stem and not the entire track.


MANAGING AND GROUPING EFFECTS
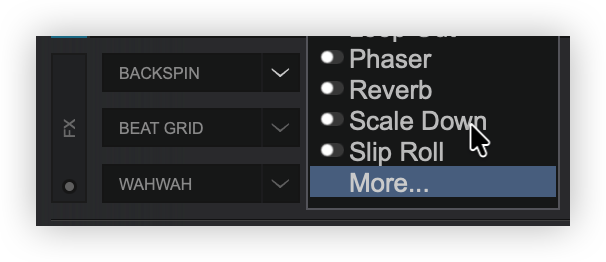
Scroll to the bottom of the Effects List and click on More... or Manage... (depending on the list displayed) to open the Editor.
The Audio Effects List Editor will open to add and remove effects in the available lists, create new lists, and/or delete lists.
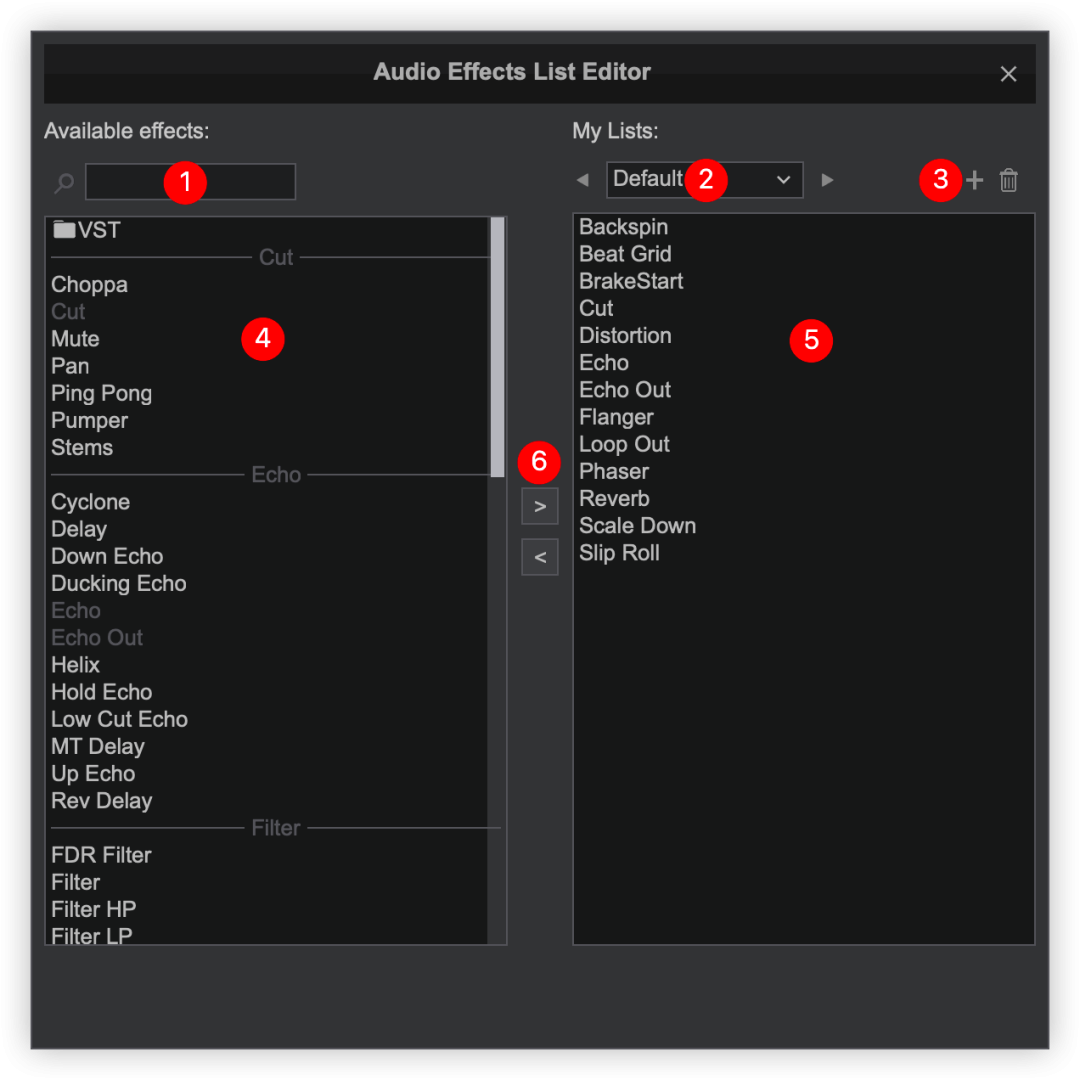
- EFFECT SEARCH BAR. Searches available effects to quickly add to the current list.
- CURRENT LIST. Displays the current list being edited. Clicking the left and right arrows will cycle through the available effects lists. Selecting the dropdown arrow will display all lists with the option for New... which will create an empty list.
- LIST ADD/REMOVE. Clicking on the button will create a new empty list. Clicking the trashcan will ask to delete the current list. Clicking YES will delete the list only and not the effects.
- AVAILABLE EFFECTS. Displays all available effects categorized by style. When using the Effect Search Bar, the effects that do not match the search query will disappear. Effects that are white are available to add to the current list while effects that are greyed out are already in the list being edited.
- CURRENT EFFECTS. Displays the effects that are in the current list. Effects in this list can be dragged and dropped to re-order the list based on user preference.
- EFFECT ADD/REMOVE. Clicking on an effect from the Available Effects list and then clicking on the button will add it to the current effect list. Clicking on an effect from the current list and clicking on the button will remove it from the current list and add it back to the available effects list.
VST EFFECTS

Virtual Studio Technology (VST) is a software interface created by Steinberg that integrates software audio instruments (VSTi) and effect plugins with audio editors, hard-disk recording systems and dj-ing applications. VST technology uses digital signal processing to simulate traditional hardware in software. Thousands of plugins exist, both commercial and freeware.
VirtualDJ supports VST and VSTi effect plugins. These are usually simple .dll files that come zipped in a file to facilitate download through the internet.
Installing and using VST effects
Windows: Extract and copy the .dll file of the VST to the sound effects folder of VirtualDJ (\Users\YourUsername\Documents\VirtualDj\Plugins\SoundEffect)*.
Mac: Install the .dmg file to your computer. Open the contents of the file and find the .vst file that you wish to install. Copy the file and paste it in the effects folder (\Documents\VirtualDj\Plugins64\SoundEffect)*. Once pasted into the folder rename the ".vst" extension to ".bundle". This is necessary for VirtualDJ to recognize the VST.
*On newer installations, VirtualDJ no longer uses the Documents folder to store data. The new home folder locations are as follows:
\Users\YourUserName\AppData\Local\VirtualDJ
\Users\YourUserName\Library\ApplicationSupport\VirtualDJ
Alternatively, if you already have VSTs installed in a folder on your computer, you can point VirtualDJ to their location by going to Options vstFxFolder and selecting the folder where your VSTs are located.
After that your Effect will be listed along with your other effects and you can select and use it like the default ones. A restart of the software will be necessary if the VST was installed while the software was open.
VST Effects usually provide their own GUI. Use the + button from the skin or the settings icon from the Effects List, to get a floating window with the effect’s interface.
This setup is pass through. Mapping for the device is handled by the selected VST (if offered).

Loops