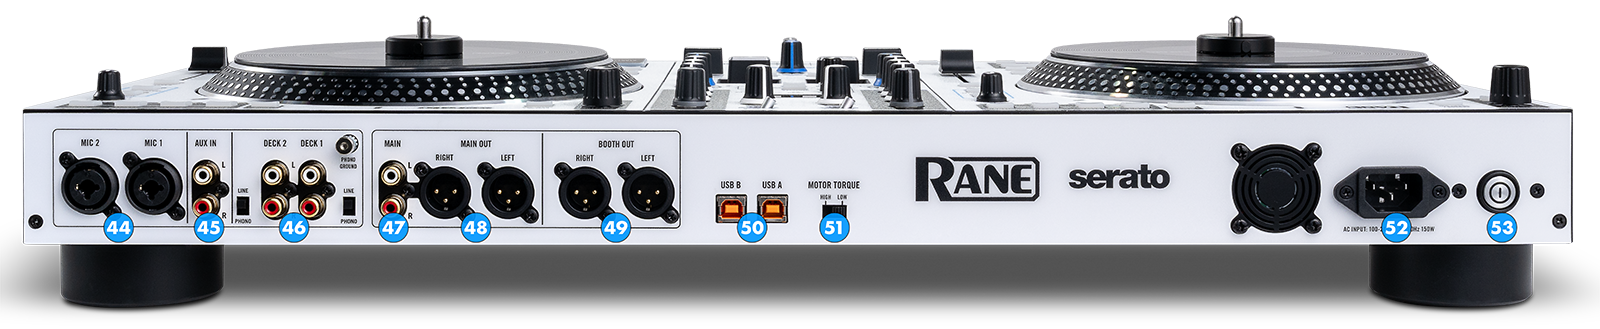
MIC 1/2 INPUTS. Connect up to 2 Microphones, using XLR or TRS plugs. Their signals will be routed directly to the Master Output. Their volumes are controlled from the front panel. Note that both Microphone inputs are controlled directly from Rane One MKII firmware and they should not be used on Audio Setup.
AUX INPUT. Use RCA cable/adapter to connect an auxiliary media source. Its audio signal will be routed directly to the Master Output. The volume of this input is controlled from the front panel. Note that the AUX input is not part of the USB Audio Interface, thus its operation will not be controlled from VirtualDJ nor can be part of the Audio Setup.
DECK 1/2 INPUTS. Connect your analog gear (like CD Players and Turntables). The audio signal of these devices will be routed on Left/Right channel of the mixer, when the top SOURCE switchers are at LINE position. You can also use these inputs to connect Timecode devices (for DVS). In this case, the top SOURCE switchers need to be at USB position.
Attention: When you connect a device on the PH/CD RCA plugs make sure that you also switch the PH/CD switch on the appropriate position depending on the device you have connected. Failing to do so may result in heavy distortion or a very weak signal of the analog source.
MAIN OUTPUT 2. Secondary Master Output (Unbalanced). The level of this output is controlled from the MAIN knob at the top panel. Use RCA cable/adaptor to connect your amplifier or other consumer grade devices.
MAIN OUTPUT. Primary Master Output (Balanced). The level of this output is controlled from the MAIN knob at the top panel. Use XLR cable/adaptor to connect your main amplifier or self-amplified speakers.
BOOTH OUTPUT. Booth Output (Balanced). The level of this output is controlled from the BOOTH knob at the top panel. Use XLR cable/adaptor to connect your booth amplifier or self-amplified speakers.
USB (Type B) PORTS. Connect a standard USB cable to connect Rane One MKII with your computer. You can connect up to two computers by using the two ports of the device (labeled USB A and USB B). Make sure that you turn the channel SOURCE switches at the top panel to the correct USB port for software mixing.
MOTOR TORQUE. Use this switch to adjust the torque of the motors between HI and LOW.
POWER CONNECTOR. Connect a standard IEC power cable.
POWER SWITCH. Turns ON/OFF the power of the device. Please make sure that you have made all the necessary connections on the back of the unit before turning it's power ON.