RELOOP MIXTOUR


for VirtualDJ 8.0
Last Update : July 2016
 

SETUP


Step 1. Connections


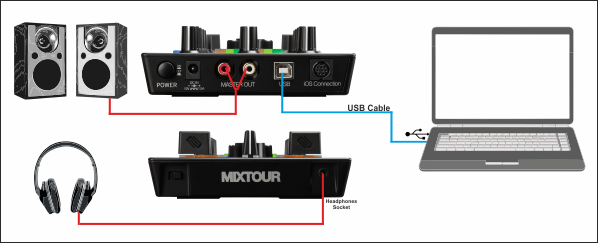
Connect the MIXTOUR with your computer using the provided USB cable. Connect your Headphones to the front socket of the MIXTOUR and your amplifier/amplified speakers to the Master Out socket at the rear side using an RCA cable. AC Power adaptor is not required.


Step 2. Drivers


Windows : Install the Reloop ASIO* drivers from http://www.reloop.com/reloop-mixtour
Mac OSX : No drivers installation is required

*The Reloop ASIO Drivers are optional. VirtualDJ will use the native Windows WASAPI drivers if not installed, without any operational issue.

Step 3. VirtualDJ


Install VirtualDJ 8 from http://www.virtualdj.com/download/index.html (in case you have not done already)

Start VirtualDJ and login with your Account credentials. A Pro Infinity, Pro Subscription or Plus Controller License is required.

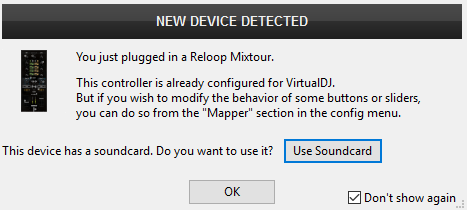
Detection Window
Click to “Use Soundcard”. VirtualDJ will automatically create the necessary audio configuration.

Click to OK
 

CONTROLS
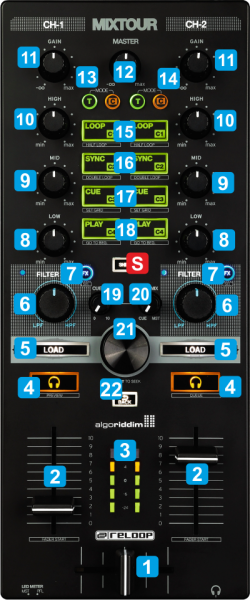


KEY

ACTION

SHIFT (SECONDARY) ACTION

S SHIFT
Press this button down to access secondary actions as described in the SHIFT ACTION column
1 CROSSFADER
Blends left-right assigned audio signals
2 VOLUME FADER
Adjust Deck Output Volume
Stops the track at the CUE position when reached minimum position. Plays the track from the CUE when moved to any other position. (FADER START/STOP)
3 VU METERS
Front Switch to Left : Indicate Master Output Level
Front Switch to Right : Indicate Deck pre-fader Output level
4 PFL
Sends Deck audio signal to Headphones Channel
Start/Stop Prelisten Player
5 LOAD
Load selected track to deck
Left LOAD : cycle through Sideview windows
Right LOAD : cycle through center Mixer panels
6 FILTER KNOB

Filter mode : Adjust High-Low Pass Filter (middle position Off)
FX mode: Adjust High-Low Pass Filter & 1st Effect Parameter at the same time (middle position Filter Off and Effect parameter at 0%)
Adjust 2nd Effect Parameter (if available)
7 FILTER/FX MODE
Toggle between Filter (Led Off) and Filter/FX modes (Led On)
Select next available Effect
8 EQ LOW

Adjust Low (Bass) frequencies - Equalizer
9 EQ MID
Adjust Mid (Middle) frequencies - Equalizer
10 EQ HIGH
Adjust High (Treble) frequencies - Equalizer
11 GAIN
Adjust pre-fader Output level (Gain)
12 MASTER VOLUME
Adjust Volume of Master Output

13 (T) TRANSPORT MODE

Selects Transport mode

Smart Play
14 (C) CUES MODE

Cycles though HotCue and Sampler mode

HotCue mode : Smart Cue
Sampler mode : Next Sampler Bank
15 LOOP

Transport mode : Enable/disable the selected Loop
HotCue mode : Sets or triggers HotCue 1
Sampler mode : Triggers Sample 1*
Transport mode : Halves the size of the Loop
HotCue mode : Deletes HotCue 1
Sampler mode : Stops Sample 1*
16 SYNC

Transport mode : Syncs tempo and phase with opposite deck
HotCue mode : Sets or triggers HotCue 2
Sampler mode : Triggers Sample 2*

Transport mode : Double the size of the Loop
HotCue mode : Deletes HotCue 2
Sampler mode : Stops Sample 2*
17 CUE

Transport mode : Sets, triggers and previews the temporary CUE
HotCue mode : Sets or triggers HotCue 3
Sampler mode : Triggers Sample 3*

Transport mode : Manual beat Tap
HotCue mode : Deletes HotCue 3
Sampler mode : Stops Sample 3*
18 PLAY

Transport mode : Play/pauses track
HotCue mode : Sets or triggers HotCue 4
Sampler mode : Triggers Sample 4*

Jumps to the beginning of the track
HotCue mode : Deletes HotCue 4
Sampler mode : Stops Sample 4*
19 HEADPHONES VOL

Adjust the Output volume of the Headphones channel

20 HEADPHONES CUE/MIX

Blends audio signal from Headphones (minimum position) and Master Mix (maximum position)

21 BROWSE

Scrolls through files or folders
If T mode button is pressed, seeks through the track
If track plays on the Prelisten Player, seeks through the track
BROWSE PUSH

Sets focus to the Songs list

Adds selected track to Automix list
22 BACK
Sets focus to Folders window. Collapses/expands sub-folders if focus is to Folders.

Sets focus to Sideview


(*) If the selected Sampler Bank has less than 5 Samples, both sides will trigger the same Samples. If the selected bank has more than 4 Samples, the left buttons will trigger samples 1 to 4 and the right buttons will trigger samples 5 to 8.


Hardware Integration Department
2016 - ATOMIX PRODUCTIONS


Reproduction of this manual in full or in part without written permission from Atomix Productions is prohibited.