SETUP
Drivers & Firmware
(Windows & Mac) No drivers is required to be installed. The Korg nanoPAD is a USB compliant device and your Operating system will automatically install the necessary drivers for the unit.
VirtualDJ 8 Setup
Download and install VirtualDJ 8 from http://www.virtualdj.com/download/index.html (in case you have not done already)
Once VirtualDJ 8 is launched, a Login Window will appear. Login with your virtualdj.com account credentials.
A Pro Infinity, a Pro Subscription or a PLUS License is required to use the Korg nanoPAD. Without any of the above Licenses, the controller will operate for 10 minutes each time you restart VirtualDJ.
http://www.virtualdj.com/buy/index.html
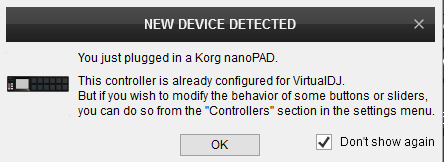
 A detection window will appear next verifying the proper connection.
Click to OK

The unit is now
ready to operate.
MIDI Operation.
The unit should be visible in the CONTROLLERS tab of Config and the “
factory default” available/selected from the Mappings drop-down list. The factory default Mapping offers the functions described in this Manual, however those can be adjusted to your needs via VDJ Script actions.
Find more details at
http://www.virtualdj.com/wiki/VDJ8script.html 
For further software settings please refer to the User Guide of VirtualDJ 8.
http://www.virtualdj.com/manuals/virtualdj8/index.htmlCONTROLS
 S SHIFTThis Pad has been assigned as SHIFT. Press this Pad down and then press a different Pad to trigger its secondary action (see tables below)S SCENEUse this button to cycle through the 4 available scenes and assign the Pads to a different mode. The Pads will trigger different actions depending on the selected modeH HOLDHardware operation button. Cannot be assigned to any VirtualDJ action
When enabled, the triggered Effect will not be deactivated when the XY Pad is released. See Effects.F FLAMHardware operation button. Has no effect on VirtualDJ assigned actions and cannot be assigned to any VirtualDJ actionR ROLLHardware operation button. Has no effect on VirtualDJ assigned actions and cannot be assigned to any VirtualDJ actionThe following keys offer the same functionality, regardless the selected Scene (mode)
KEY
ACTION
D DECKAssigns the unit to the next available VirtualDJ Deck. All the actions described in this manual apply to the assigned/selected Deck.
When only 2 decks are used, deck selection will toggle through Left and Right. When more than 2 decks are used, the selection will cycle through the available DecksF XY PADPress and hold the XY Pad to trigger the selected Effect. Move across X Axis to adjust the 1st Parameter of the selected Effect. Move across Y Axis to adjust the 2nd Parameter of the selected Effect
Use the SCENE button until the Scene 1 is selected (1st LED from the top will be lit), to assign the PADs to the
Sampler mode.
The
Sampler Pad page will be then automatically selected in the Pads section of VirtualDJ GUI.
KEY
ACTION
SHIFT (SECONDARY) ACTION
1-8 PADS 1-8Triggers Sample 1 to 8 from the selected Sampler BankStops the Sample 1 to 8 from the selected Sampler Bank (useful if the Unmute or the Stutter trigger mode is selected)P- PARAM-Select and Load the previous available VirtualDJ Sampler BankSelect the previous available Sampler Trigger mode (On/off, Hold, Stutter and Unmute)P+ PARAM+Load and select the next available VirtualDJ Sampler BankSelect the next available Sampler Trigger mode (On/off, Hold, Stutter and Unmute)
Use the SCENE button until the Scene 2 is selected (2nd LED from the top will be lit), to assign the PADs to the
Hotcue mode.
The
Hotcue Pad page will be then automatically selected in the Pads section of VirtualDJ GUI.
KEY
ACTION
SHIFT (SECONDARY) ACTION
1-8 PADS 1-8Assigns current track's position to Hotcue 1 to 8 (if empty) or jumps to the stored position if Hotcue 1 to 8 is assignedDelete the assigned Hotcue 1 to 8P- PARAM-Jumps to the previous available HotcueMoves track backwards by 1 beatP+ PARAM+Jumps to the next available HotcueMoves track forward by 1 beat
Use the SCENE button until the Scene 3 is selected (3rd LED from the top will be lit), to assign the PADs to the
Loop mode.
The
Loop Pad page will be then automatically selected in the Pads section of VirtualDJ GUI.
KEY
ACTION
SHIFT (SECONDARY) ACTION
1-8 PADS 1-8Triggers a Loop of a different size in beats, depending on the selected Loop page (bank) P- PARAM-Selects the previous available Loop page(bank)Selects the previous available Loop mode (On/Off, Hold, Roll)P+ PARAM+Selects the next available Loop page (bank)Selects the next available Loop mode (On/Off, Hold, Roll)
Use the SCENE button until the Scene 4 is selected (bottom LED will be lit), to assign the PADs to the Effects mode.
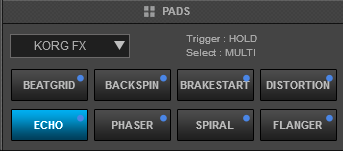
A special Korg FX Pad page will be then automatically selected in the Pads section of VirtualDJ GUI. 
Korg FX VirtualDJ Pad page KEY
ACTION
SHIFT (SECONDARY) ACTION
1-8 PADS 1-8Selects the Effect as per the image above, to be controlled from the XY Pad The currently lit Pad on the VirtualDJ GUI will indicate the selected EffectTriggers the assigned Effect as per the image aboveP- PARAM-Selects the Hold FX Trigger mode. When selected, the XY Pad will trigger the selected Effect while the XY Pad is pressedSelects the Single Selection mode. When selected, all the activated Effects will be turned off, when a new Effect is selectedP+ PARAM+Selects the On/Off FX Trigger mode. When selected, the XY Pad will toggle (activate/deactivate) the selected Effect on every XY Pad pressSelects the Multi Selection mode. When selected, the enabled Effects will not be turned off when a new Effect is selected (allowing multi-chained Effects)
For further Technical features and specifications, visit KORG nanpPAD
Product's Page
 Hardware Integration Department 2017 - ATOMIX PRODUCTIONS Reproduction of this manual in full or in part without written permission from Atomix Productions is prohibited.


